Tuesday, July 21, 2009

New Ideas for Scrapbooking

Just an idea of materials that you don’t normally think of using when creating a scrapbooking layout.I've been thinking of these things for the past few weeks and now sharing them with you.

  • Old vintage ribbons
  • Decorative belt buckles; a pair of pants that I had outgrown but took the belt buckle to use myself
  • Buttons ; the ones you get when buying clothing
  • Sea shells and even sand; just use your thin glue where the sand is needed
  • Dog/cat collars or buckles; on your pet pages or even in your normal scrapbooking pages
  • Lace; nanas usually have plenty in their stash
  • Broken jewelry/charms; I had a large heart pendant that broke in half and used on one of my artist cards for school
  • Jewelry; ones not worn anymore and use the charms
  • Search your op-shops and second hand places for bits and pieces
  • Paper doilies; you can even ink and die them colours
  • Packaging of products; even in clothing (lingerie) and tags from scrapbooking things (the
  • Kaiser new products have cool tags)
  • Bird feathers
  • Dictionary pages; not just for the word your using on you page but also as a background paper
  • Sewing zippers; using bright zips creates a great effect
  • Cd’s; not ones you plan on listening to of course but ones that are scratched etc, even braking them up and using pieces or putting it back together
  • Fabrics; for tying across the page or just as the plain canvas to work on
  • Small twigs; tie ribbons etc on them on grungy and brown pages
  • Clock faces, numbers and hands
  • Keys; old ones you keep but don’t actually know what they lock
  • Gems; a large gem fell off my shoe but I used in one of my pages
  • Ribbons used to tie up different products, some was used on a bundle of fabrics I bought, it went straight into my stash

Hope these are useful to every scrapper out there

Sunday, July 12, 2009

New Layout; Its times like these

This is the last of the layouts Ive created these holidays

Its times like these;
The background piece is American Crafts Cardstock. The green heart strip os a piece from a My Little Shoebox range. The other circular piece is one cut from a large die-cut piece, the centre piece from another layout. The little houses are all cut out and mounted on the page with foam mounting tape. These are also from My Little Shoebox. All photos are distressed around the edges with sandpaper to show a little white. One photo is matted in hot pink Bazzil Swissdots cardstock. The title is made up of letters from Pink Paislee and other ones from Adorn It, they have been inked around the egdes with light brown ink. The egde of the page is also inked around the edges in brown. The piece of ribbon is just from my stash. Journalling done just under the title.

Heres some close ups


Friday, July 10, 2009

New Layout; Such A Cutie Pie

Heres another layout Ive been working on it is of Molly when she was alot smaller;

Such a Cutie Pie:
The background piece is one of the aqua colours in the Bazzill Swissdot range. The large pink piece of paper in the centre is a piece from also from one of the new Kaiser Ranges, Child’s Play. Photo is matted in light pink and then in aqua, the same as the background piece. Corner of the pink piece is folded over and stapled down. The two die-cuts are from the Die-cut Elements that match this range. There is a piece of ribbon across the diecuts; it has a brad at each end to hold it to the page. There is also an embellishment with a paw brad added to the top of it added to the brad holding the ribbon down. To the top left of the photo there is a photo tab stapled to the photo and another large brad added underneath it. I tied a piece of aqua ribbon and put it on the top of the brad. A sticker ‘M’ is on the brad, to seal it in dimensional magic was added. The title is made up of many letters. There are Pink Paislee, Heidi Swapp Chipboard letters and the pink glitter letters are from My Little Shoebox. All letters except for the glittery pink ones are distressed with sandpaper. Two flowers are pushed under two corners of the pink paper. Journalling done to the side of the photo. I have just ruled with a black pen and stamped a bracket above those lines. The photo has two flower gems, they are from a set of Hero Arts mini stamp set; they come with the stamps. The outside of the page I have hand-sewn with plain running stitch in pink thread.


New Layout; True Love

You many have seen this one on the Blossies Blog this week, and here it is on mine
True Love;
This one is using some of the new vintage papers called Duchess from Kaiser.The brown piece is cut out of the back of the page with the family tree paper and the large bracket shaped piece cut out from a larger piece of paper. It is cut into two pieces and placed on both sides of the left and right of the page. The left piece is the other side turned over. Both photos matted in Swissdot cardstock. Large piece is ripped at the bottom. Die-cuts are from the Die-cut elements pack that match the Duchess range. Letters for the title are brown ones from Rosemoka. A piece of vintage ribbon is across the page and tied just off-centre. Two pins are pushed through the knot. Two crocheted flowers are to the left of the ribbon in the centre of those are little plastic vintage roses. The two brackets are mounted on the page with foam mounting tape. Two eyelets added next to the title. The diecut to the left of the photo has a flower added to the centre with a smaler diecut in the middle of that. On the smaller die-cut three brads are used they are also Kaiser but are from the What A Hoot range. Some I got a while ago and had sitting there, it just matches the rest of the layout perfectly. Other green and brown flowers are slid under some of the diecuts that are used for journalling and the sub-title. Title is distressed with sandpaper and a photo tab added the the behind of the letters. The background piece is some of American Crafts Cardstock; Coffee colour.


Heres some close ups;


Monday, July 6, 2009

New Layout; Piano Photo Shoot

Piano Photo Shoot
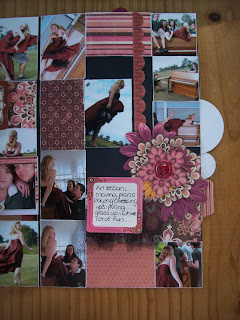
All the papers used are also from one of the new Kaiser ranges; Pennyroyale.The backing piece is black Bazzill card.
The first page has a strip of the Lillian paper from the Pennyroyale collection, I have traced scallops using a ruler and then cut out. It is distressed with sandpaper around the edges. On this piece is the title. The brackets are stamped and then glued onto chipboard and cut out. It was stamped in bright red and then light brown ink rubbed over the top. A piece of black tulle is gathered under the first word in the title. All three words are put onto die-cuts, they are from the Die-cut Elements that match the range. The letters are from Heidi Swapp Chipboard letters and brown letters from Rosemoka. All are distressed with sandpaper. The die-cuts are mounted on the page with foam mounting tape. The flowers are cut out from the Wendy piece of paper. All are mounted on top of each other. Flowers are folded in half and pushed under the cut out flowers. A button is added to the centre of the flower. All photos are small. I printed out 4 photos per one 6’ by 4’ photo. Most of the small photos are 2’ by 2’. The large ones are 3’ by 2’ and 4’ by 4’. All photos are sanded around the edges with sandpaper to make the edges white. There is a smaller die-cut added to the corner of the bottom right photo, mounted with foam mounting tape.


Heres some close ups;


Heres the second page; this is the outside with the flaps closed
The second page has fold out pieces, it is big and was a lot of work!! The front left flap is a piece of Evelyn paper and then a smaller strip of Anne. There is a photo tab stapled onto the edge. The right flap has photos all cut to 2’ by 2’ and two 3’ by 2’. All photos and papers are sanded around the edges with sandpaper. The largest flower is cut out from the Wendy piece of paper, it again is layered with foam mounting tape with flowers either cut in half or folded in half and pushed under the pieces of cut flowers. A button is added to the centre of the top flower. A small piece of Anne is added 2’ by 2’, one 3’ by 2’ of the reverse side of Caroline and another smaller 2’ by 2’ of the first side of Caroline. A bracket is mounted with foam mounting tape and onto the page. Three die-cuts are added to the side of the page. Two are stapled on, one with tape. There is a circular piece of mirror in the centre of that.


This is the middle of the large open-out page;
The main centre piece is similar to the first page with a variety of photo sizes used. A piece of Wendy, reverse side of Wendy, Anne, Lillian and reverse side of Lillian is used. Like all the other pages everything is sanded. A sub-title is added onto this page. It it using Heidi Swapp letters added onto two die-cuts. The letters are distressed with sand paper. The sub title word; art has black tulle gathered underneath it. One flower is cut in half and added to the top and bottom of the “09” die-cut. The paper flower is cut out from the Wendy paper and paper flowers pushed underneath the sides. A button added to the centre of the flower. One photo has a corner added to it with foam mounting tape and another bracket.


The left inside flap;
The inner left flap has photos all 3’ by 2’ with one being 2’ by 2’. A piece of Anne is added that is 3’ by 2’ and another just smaller piece of the reverse side of Wendy. Flowers cut out from the Wendy sheet of paper with flowers pushed under and a piece of red tulle added underneath the larger flower. All photos and papers are sanded around the edges with sandpaper.


The right inside flap;
The inner right flap is similar, photos all cut to 3’ by 2’ and 2’ by 2’. All papers and photos are sanded there is a piece of Anne and reverse side of Wendy. A scallop die-cut is also used. Journalling done on another die-cut with black tulle gathered underneath it. Flowers also cut out from the Wendy piece and paper flowers pushed under the sides.


The pieces included in the page, a tag and an extra photo;
One tag is added into the page, it is covered in a piece of Anne. A piece of scalloped die0cut added to the side of the photo. One die-cut is mounted onto the tag. A small piece os blak tulle is tied through the tag. There is one large photo also folded into the page. It is sanded like the rest with one die-cut added to the side of it. It has another sub-title using brown Rosemoka letters, they have been distressed with sandpaper. A piece of black tulle is gathered underneath half of the die-cut. Two brown Kaiser pearls are added next to the sub title.


Sunday, July 5, 2009

New Layout; Miss Molly

Miss Molly;
Backing paper is just one from Kaiser, it comes from the purple butterfly range, one that has a slight pattern on the back. Orange bazzil used for the template used with the photos. All the paper scraps came from my scrap box stash. I think they are My Minds Eye and Making Memories {noteworthy} range. Flowers and gems just from my stash and the little die cut also from my stash, it came in one of those packets at Blossies that had many diecuts all with similar themes. Photos are all cut to fit into the orange template perfectly. The title is made up of two different letters. The little orange letters are My Little Shoebox and the bigger blue ones from Pink Paislee. Stamping the date is with lack chalk ink using the stamps from a Kaiser stamp range- “Dated”. Piece of ribbon is also from my stash. Orange little cross-stitches are in the corner that are hand sewn.


Heres some close ups;


For this layout I used an idea found in a magazine, that can be downloaded from the internet as a template, here is the link;


http://http//www.creatingkeepsakes.com/articles/Computer_Tricks_Online_Bonus_Photoshop

New Layout; Art Night

Art Night
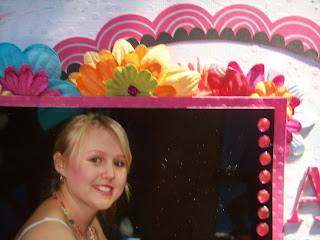
This is a busy layout. Many, many flowers and bits and pieces used. Flowers are some from Blossies, Spotlight and Kaiser. Large flowers also from Blossies. Buttons are all from my stash. Along the left side and top flowers are folded and layered, many sizes and colours used. Also with the flowers are buttons slid under the photo. The photo is matted in hot pink Bazzill Swissdots cardstock. Title is made up of Heidi Swapp chipboard hot pink letters, Pink Paislee blue and aqua letters. The transparency is a piece cut from a large sheet of Hambly Screeen Prints.Felt butterfly, dragonfly and lady bug are all things from my stash that have been in there forever and are finally being used aswell as the brad next to the title. Five different pieces of ribbon are tied around to circular piece of card. This is a large die-cut piece from My Little Shoebox, it was a circular piece with the centre cut out and used on another layout. The backing piece is one from the embossed range from Bazzill, it is inked with many colours to show all the patterns. The colours used are bright green, blue and pink. All letters are distressed.Journalling done just under the title. Middle of lagre flower has two buttons layered on top of each other.Large rhinestones down the right side of the photo;hot pink colour.


Here's some close ups;

Many New Layouts; using Kaiser Pina Colada


Oh That Swingset;
All papers and bits and pieces are from Kaiser, and just a few things from my stash. Backing piece and all smaller pieces of paper are from the Pina Calada range. Photo matted in Bazzill Swissdot aqua colour. The flowers and large flourish is from the Kaiser Magazine, there is pieces that you get for free when you buy the magazine. They are cut out and mounted on the page.Flowers are folded in half and then pushed under the edges of the flowers. The pink flower has dimensional magic on it. The die cuts are from the Die-cut Elements that match the Pina Calada Range. The large flamingo is from a piece of paper cut out mounted on the page and then dimensional magic is added. Pieces of ribbon stapled onto the page, some aqua pom-pom to match the rest of the layout. Title is made up of three different lettering. Small orange letters are from My Little Shoebox, pink letters are Heidi Swapp Chipboard letters and the other orange letters and the date are from Pink Paislee. All pieces of paper and the photo are distressed. I have rubbed sandpaper on the edge to mke it white, something I’ve been doing with many layouts lately, I like the way it makes the photo stand out more and gives it a more distressed look. Journalling done on one of the die-cuts. Rub-ons in the corner and under the flowers are from Hambly and the clip on the photo just from the stash. Photo tab added to the top of the page with small letters added.


Heres some close ups:


Bikini Babes;
Piece of white American Crafts car for the backing piece. All of the papers used are from one of the new Kaiser ranges at Blossies. Pieces have all been cut out from the Pina Calada range. The die-cut elements sheet to match the Pina Calada range is also used many of the pieces from the two sheets you get. Ribbons and flowers are all from Blossies, some of the flowers are Kaiser. All the bits and pieces are from my stash also, I just kept pulling out thing that would go with the theme and kept adding them in. the parrot cut out from one of the sheets of paper and then mounted with foam mounting tape and dimensional magic was put on top. The top corner of the page has a tab with the year date on it, they are letters by My Little Shoebox. Other letters used are Pink Paislee, Doddlebug Design and Heidi Swapp. Some brads are flocked. The large rub-on in the top left corner is one from Hambly. There is cross-stitching, running stitch and blanket stitch all used on the page aswell. Photo was matted in the Bazzill Swissdot hot pink. All pieces of paper are distressed. Journalling done on one of the die-cuts.
Here are some close ups;